Harp Ukulele blog:
July 23rd 2012
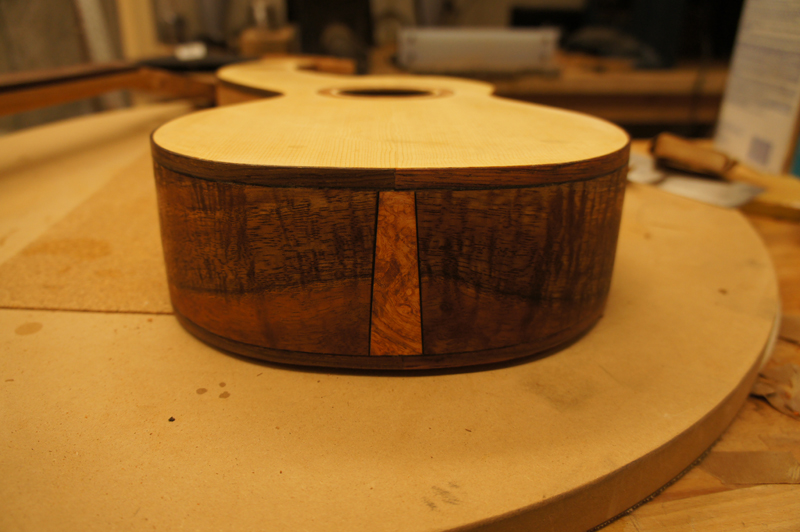
I spend this weekend almost finishing the bindings. I used a stewmac true channel binding tool with a colt router
to route most of the rebate for the bindings.
I was able to use my ibex purfling cutter to finish most of the rest near the harp peg head.
The remainder including the top edge of the rims between the harp peg head and the rims I used a combinations
of my razor saw, xacto knife and a chisel. All and all I think it is going to look OK, but it was the hardest
job that I have done on an instrument yet.
The job might of been easier but after carefully setting the router bit, some how on the first cut on the
lower bout I noticed that I went .01 too deep. I am still not sure what happend. Maybe the router was not
locked into position. My test route was perfect. I probably could have left it and sanded down the top near
the edge, but I glued an additional strip of fiber purfling on the bottom edge of the binding for the lower bout.
I routed the other lower bout half with the same setting then adjusted the router properly for the rest of
the cut. I feathered the purfling and the rebate transition. So on the bottom of the instrument the
black purfling line is a little thick.


July 28th 2012
I am in the end game of the construction phase of the is project. I have the body, neck, headstocks
sanded. I drilled the harp tuning pegs. The neck angle is set and the fretboard is glued to the neck.
Also I laminated some black veneer to a bit of koa and used it for the heel cap.
The bridge. I have some bone pegs I am going to use to make individule post nuts for harp. I laid out the hole position on the harp
pegboard, based on the string path to the bridge.


 A few more pictures:


July 29th 2012
I just completed the construction and am ready for finishing. I will pore fill with zpoxy.
I am still debating between a u-beaut FP or spraying EM6000.
As a reminder this instrument based on a set of plans from Pete Howlett.
I was inspired by the
harp ukulele Kathy Matsushita built.
She is currently working on a so I get to follow her in real time.
second harp ukulele.
This is a tenor sized ukulele with the harp extension for 4 sub base strings.
The instrument has a Sitka bear claw top and koa back and sides.
The binding are cocobolo with a black fiber purfling strip. The neck and the harp peg
head are made from Honduran mahogany. The rosettes, the peg board veneer and the end wedge
are amboyna burl, the last from a turning block I bought last year. I have koa veneer on the
back of the ukulele head stock and as a end cap on the heel. The bridge and fret board are East
Indian Rosewood. The fretboard also has cocobolo bindings. It is not perfect. but I am really happy
with the way it is coming out. Working with the odd ball shape presents knew problems each time I work on it.


August 1th 2012
Here are some pictures with the second coat of Z_poxy, a finishing epoxy that I use to fill the pores in the the back sides and neck.


August 11th 2012
One step forward a few steps back. I was doing the final sanding of the top; getting ready to spray … when I sanded the treble side of the upper bout too thin not paying attention while trying to fix a flaw. I started a repair and was making good progress, involved cutting a prufling channel out to pick-up another area near the peghead that was not great, when I stopped and reassessed the situation. This can be a really nice instrument. I am in no hurry to finish and nobody is waiting for it. So...
I decided I was going to put a new top on with new bindings.
I pulled out my heat gun; popped the bindings off, also used heat to take the top off. I cleaned the body and I have some reverse kerfling setting into shape. Interesting with the reverse kerfling I need to expand the kerfs in the waist area to allow it to bend enough.
A few pictures of the mess ...


 Starting on the new top. wish me luck
[img]http://www.harvestmoonguitars.com/HarpGuitar/DSC01484.jpg"/>
Starting on the new top. wish me luck
[img]http://www.harvestmoonguitars.com/HarpGuitar/DSC01484.jpg"/>
August 18th 2012
I think I am back on track, I have every thing back together again, except for the bindings. I have the channels cut and ready for the binding. After my last attempt, this time my binding channels are perfect, just where I want them. I did figure out why I messed up my last set, followed by my poor attempt to hide the error. I use a stewmac tower jig. It works OK as long as you have the correct bearing except the last time I used it. There is a little screw that holds the plastic donut on to the router carriage. This came loose on mine, and there was something holding the donut skewed through the time I set the height and tested it. While doing the routing the shaking and gravity tighted the donut to the carriage resulting in a deeper cut than I wanted. I found this out today, because it happend again! but on my second test pass. Finally up is not down, red is not blue there is reason in the world I understand why the channel height changed the last time.
So now with a top of the corrrect thickness, glued to the body and the binding channel cut and ready, I should be ready to finish the construction the second time tomorrow. I am really happy I tore the top off and remade it. I learned how to retop an instrument and change the bindings keeping overal depth the same.


August 20th 2012
The bindings are back on without the messed up top or purfling lines. Now I am really glad I changed the top!


Next
| 